
Understanding brake pad measurement is one of the smartest ways to maintain your vehicle. Brake pads are wear items, meaning they gradually become thinner every time you stop. If ignored too long, worn pads can reduce stopping power, damage rotors, and increase repair costs.
This guide explains how brake pad thickness is measured, what numbers matter, how to inspect pads, and when replacement is usually recommended.
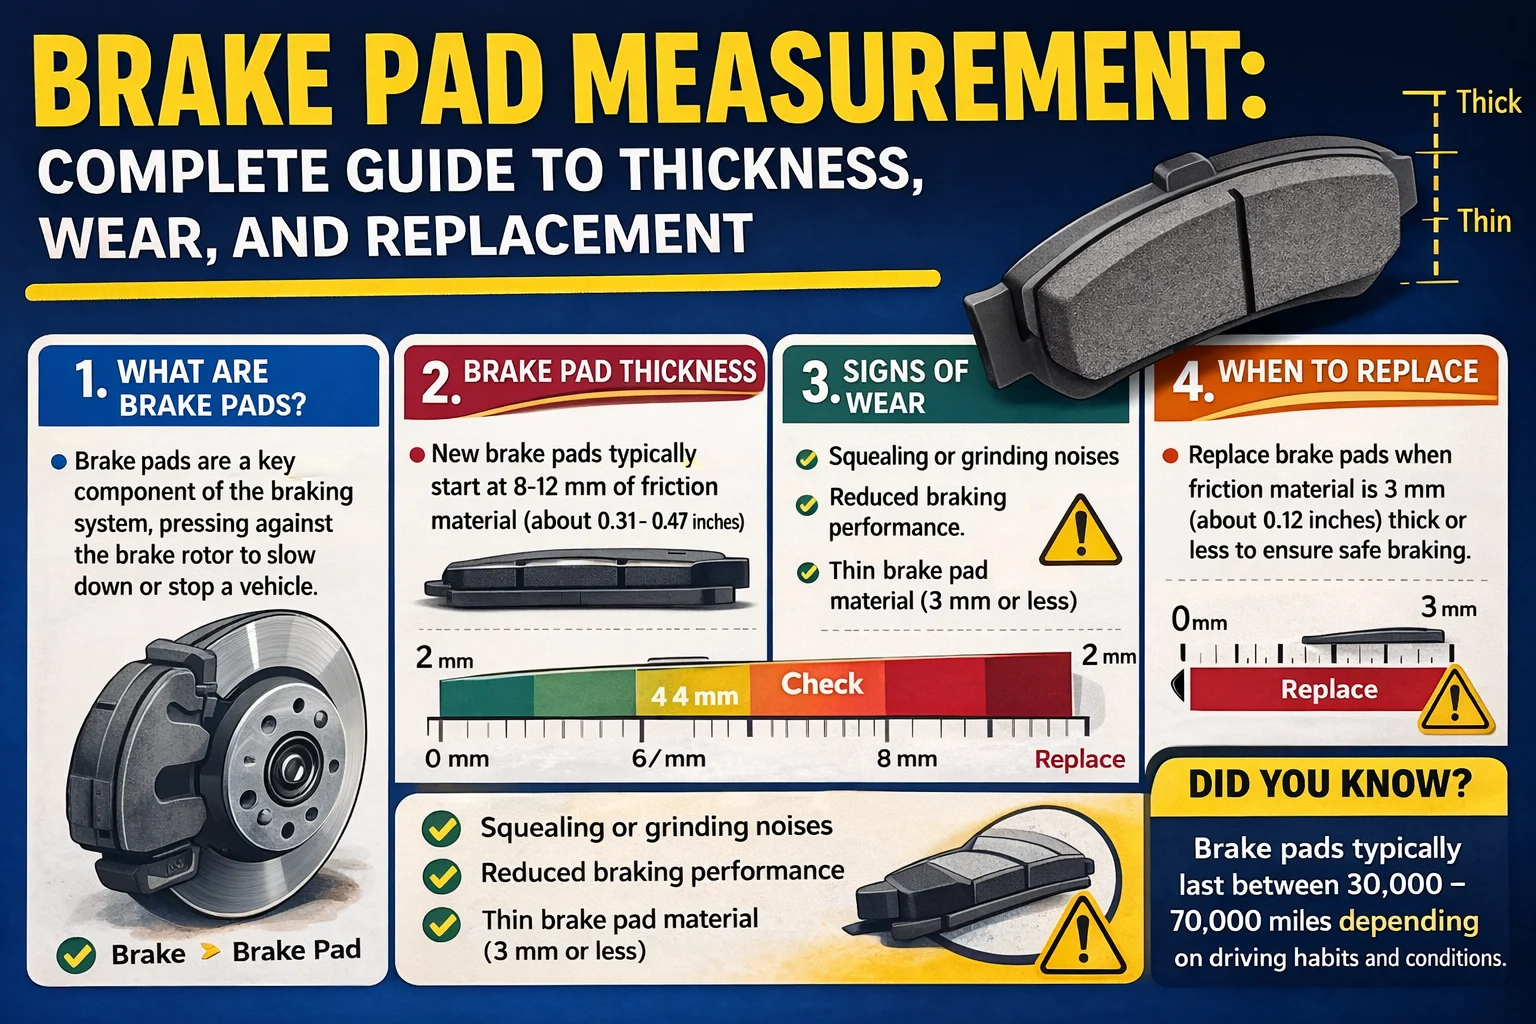
What Is Brake Pad Measurement?
Brake pad measurement usually refers to the thickness of the friction material remaining on the brake pad.
When you press the brake pedal:
- The caliper squeezes pads against the rotor
- Friction slows the wheel
- Pad material wears down over time
So checking pad thickness helps estimate remaining service life.
Most technicians measure in:
- Millimeters (mm)
- Sometimes inches in manuals or aftermarket specs
Why Brake Pad Thickness Matters
Thin brake pads can lead to:
- Longer stopping distances
- Noise and squealing
- Rotor scoring or damage
- Overheating under heavy braking
- Reduced safety margin in emergencies
Regular brake pad measurement helps catch wear before it becomes expensive or unsafe.
Standard Brake Pad Measurements
Exact specifications vary by vehicle, manufacturer, and pad design. However, these ranges are common for many passenger cars.
New Pad Thickness
Many new pads start around:
- 10 mm to 12 mm friction material
- Some designs may be thicker or thinner
Normal Service Range
Pads often perform well in:
- 6 mm to 9 mm
Replace Soon Range
Pads are commonly monitored closely at:
- 4 mm to 5 mm
Critical Minimum Range
Replacement is often recommended around:
- 3 mm or less
Some shops advise replacement earlier depending on driving style, towing, terrain, or weather.
Brake Pad Thickness Chart
| Pad Thickness | Typical Condition | Suggested Action |
|---|---|---|
| 10–12 mm | New / near new | No action needed |
| 7–9 mm | Good | Routine monitoring |
| 5–6 mm | Mid-life | Recheck next service |
| 3–4 mm | Low | Plan replacement soon |
| 0–2 mm | Worn out | Replace immediately |
How to Measure Brake Pads
1. Visual Inspection Through Wheel Openings
Some wheels allow you to see the outer pad without removing the wheel.
Look for:
- Friction material thickness
- Uneven wear
- Cracks or glazing
- Rotor grooves
This gives a rough estimate but may not show the inner pad clearly.
2. Using a Brake Pad Gauge
A brake pad gauge is a simple tool used by many technicians.
Steps:
- Park safely on level ground
- Ensure vehicle is secure
- Access the pad viewing area
- Insert gauge against friction material
- Read thickness in mm
This is one of the easiest accurate methods.
3. Measuring During Wheel Removal
Best method for full inspection.
Steps:
- Lift vehicle safely using proper equipment
- Remove wheel
- Inspect outer and inner pads
- Measure remaining friction material
- Compare both sides of axle
This also allows checking rotors, boots, and slide pins.
Front vs Rear Brake Pad Wear
Brake wear is not always equal.
Front Pads
Front brakes often wear faster because many vehicles transfer more weight forward during braking.
Rear Pads
Rear pads may last longer, but not always. Electronic brake distribution and driving habits can change wear patterns.
Uneven Wear Warning
If one pad is much thinner than another, possible causes include:
- Sticking caliper slide pins
- Seized caliper piston
- Misalignment
- Hardware issues
Common Brake Pad Measurements by Vehicle Type
| Vehicle Type | Typical New Pad Range |
|---|---|
| Compact car | 10–12 mm |
| Sedan | 10–12 mm |
| SUV | 11–14 mm |
| Pickup truck | 12–16 mm |
| Performance car | Varies by system |
Always verify with manufacturer specifications.
Signs Your Pads Need Replacement
Even without measuring, watch for symptoms.
Audible Signs
- Squealing
- Grinding
- Metal-on-metal scraping
Driving Feel
- Longer stopping distance
- Pulsation (may also involve rotors)
- Pulling to one side
Visual Signs
- Very thin pad material
- Uneven wear
- Damaged backing plate
If grinding starts, service is urgent.
How Often Should You Check Brake Pad Measurement?
General guideline:
- Every tire rotation
- Every oil service interval
- Every 10,000 to 15,000 km
- Before long road trips
- Any time noise develops
Driving conditions matter.
Frequent stop-and-go traffic, hills, towing, or aggressive braking can shorten pad life.
Brake Pad Wear Example Table
| Driving Style | Approximate Wear Speed |
|---|---|
| Mostly highway | Slower |
| Mixed city/highway | Moderate |
| Heavy city traffic | Faster |
| Mountain driving | Faster |
| Towing/heavy loads | Faster |
Common Mistakes People Make
Only Checking Outer Pads
Inner pads may wear faster and be hidden.
Waiting for Noise
Some pads wear quietly. Noise is not always the first sign.
Ignoring Rotor Condition
New pads on damaged rotors can reduce performance.
Replacing One Side Only
Pads should typically be replaced in axle pairs.
Guessing Thickness
Use a gauge or professional inspection whenever possible.
Expert Tips for Longer Brake Pad Life
- Brake smoothly and early
- Avoid hard stops when possible
- Keep tires properly inflated
- Reduce unnecessary cargo weight
- Service caliper hardware during brake jobs
- Use quality pads suited to your vehicle
DIY or Professional Service?
DIY inspection can be useful if you have tools and experience. Professional service is often best when:
- You hear grinding
- Brakes pull sideways
- Warning lights appear
- Rotor replacement may be needed
- You are unsure of safe lifting procedures
Brakes are a critical safety system.
Quick Metric to Inches Conversion
For users using imperial units:
| mm | Inches |
|---|---|
| 12 mm | 0.47 in |
| 6 mm | 0.24 in |
| 3 mm | 0.12 in |
12×0.03937≈0.47
FAQs
1. What is the minimum safe brake pad thickness?
Many technicians recommend replacement around 3 mm or less, though specs vary by vehicle.
2. How thick are new brake pads?
Commonly 10 mm to 12 mm, but some vehicles differ.
3. Can I inspect brake pads without removing wheels?
Sometimes yes, depending on wheel design, but full inspection is more accurate.
4. Do front pads wear faster than rear pads?
Often yes, but not always.
5. Should I replace pads at 4 mm?
Many owners begin planning replacement around 4 mm, especially before trips or winter driving.
Conclusion
Understanding brake pad measurement helps you stay safer, reduce repair costs, and avoid rotor damage. In many vehicles, new pads start around 10–12 mm, and replacement is commonly considered near 3 mm.
If you’re unsure of your current brake pad thickness, schedule an inspection or measure them during your next tire service. A quick check today can prevent a much bigger repair tomorrow.
Discover More Articles
100 Grams Explained: Weight, Conversion, and Real-Life Examples
Barleycorn Measurement: Meaning, Size, History, and Modern Uses
125 Inches Measurement: Size, Conversion & Real-Life Examples